Wednesday, March 31, 2010

Creative Gift Wrapping

We all love getting presents, of any kind! Whether it be little ones or big ones. What makes presents even more exciting is the wrapping . Here are some creative gift wrapping ideas :)

  • You don't have to something elaborate that takes hours and hours. You can do small things like get a paper bag, cut it open, and have your kids draw on it :) easy.
  • Take scraps of fabric and wrap your present. That way once they open the present they could use the fabric for another project. It's all about recycling and reusing.


  • Do you collect the tissue from the last present you got? REUSE IT! wrap the present with it, add stickers and wrap some ribbon around it! VIOLA!


  • Ran out of boxes to put your present in? Do you have a ton of plastic containers that don't fit in your drawer, like me? Find a container that you know you can live without and put the gift in it. That way the person receiving the gift can use it for something else:)

  • Want to get super creative! Mommy Meatloaf gave Chloe an Egg full of surprises. She got an egg from a craft store, painted the egg fun colors and cut it open zig zag style! FABULOUS!


  • I Love this idea! My friend Katie gave her friends daugther, who happened to be named Chloe as well, this basket. You can do the same thing. Go to the thrift store they have tons of baskets and buy one. Add some ribbon and felt ;)


  • Don't throw away your old calendars! Use the calendar pages for gift wrapping.

Picture taken by Real Simple


I hope this sparked some ideas for your next present wrapping extravaganza! Have more ideas? Post a comment and share with us.


Leslie

Tuesday, March 30, 2010

Cupcake Invitaitons and Party Favors

Okay, I have to say that I'm pretty proud of myself for this one=) No copying here - just my pure genius (okay my husband just said he doesn't think my head will fit through the door now=p)

Introducing the best Invitations ever (drum roll...)


See? Didn't I tell you? They even pop off the little box to go straight to the refrigerator!

Okay so here is the step by step:
 To make the boxes visit this site.  They are super easy and once you get the hang of it you will be finished in no time.
1.  Free hand or Google a cupcake picture that you like and copy to the size you want for the invitation. Then cut the top from the bottom
2.  Trace the bottoms unto brown paper and the tops unto colorful paper. Cut out.
3.  I wanted to add some depth so I used chalk to make swirls on the tops and "wrapper lines" on the bottom.
4.  Glue the tops to the bottoms and add a little cherry (free handed and cut from red)
5. Use stamps or markers to add your text.  Here is how mine read:

Here is a little taste of Bella's first birthday party!
Place:
Date:
Time:
RSVP:

6. Add a magnet to the back.
7.  Put a little dab of glue and attach to your boxes.
8.  Put a mini cupcake in your super sweet box and deliver=)


Alright, now on to the sweet cupcake favors...

Aren't they adorable?  The little girls loved them and they really weren't that hard to make.  Really.  I learned to crochet on them and I made plenty of mistakes but they are very forgiving,  I used this pattern from BitterSweet.  But there are many free patterns for cupcakes if you Google crocheted cupcakes.  Have fun!


Make your life beautiful,


Monday, March 29, 2010

It's a Cupcake Party!


What a blast we had at Bella's first Birthday Party! It was cupcake themed with oranges, yellows, and pinks. I wanted to enjoy the company of family and friends so I tried to keep things simple. But, of course, I kept thinking of things to add=)

One goal I did have was to not make it so wasteful. Often times birthday parties are so disposable and I didn't want that. In decorating I tried to use things that could be reused after or give things a second life.

Left - Keeping it simple - cookies, crackers/hummus, and popcorn. My house is itty bitty and, while we love it and it suits us perfectly, I had to be resourceful in my food placement=)
Top - The Izze drinks, a natural soda, were awesome! I mean how often do you see sodas that coordinate with your color theme?
Bottom - My mom was clearing out her stash of kombucha bottles and (once again) they matched my color theme. I took them all and put silk gerbera daisies in them around the room. They added such a great splash of color and after the party I put them all together for another arrangement I don't have to worry about watering.
Right- I found a sheet set that I used in my apartment before I was married and had a double. I made the top sheet into these reusable napkins. I was so excited when I found the set because it matched perfectly. And before I was married I never made my bed or used a top sheet :o so it was brand new. I love that I can reuse these for so many things. I would suggest getting a head start on these though. Don't start the night before - which I didn't by the way =)


Top - This cupcake banner was originally a place mat found on clearance after Valentine's Day - what luck! Left - I love decorating with real flowers. This added a bright pop and I can continue to enjoy it after the party.
Right - I bought (on clearance=) a pack of Martha Stewart hair accessory kit for the little girls to put together. They had fun and it was a favor that would last a little longer than a cheap plastic toy.

Isn't she adorable! I know I'm biased, but really? Look as that smile, and the way she clapped when we sang to her? Adorable.

She hasn't had any sugar yet and while I wanted her to have the messy first cake pictures I didn't want to bombard her little system with all that sugar. However, that didn't mean that I had to substitute taste so I made her a Raw Strawberry Pie. Oh. My. Goodness. It was divine! Seriously you must try this!


Raw Strawberry Pie (found on Happy Foody) By Colleen Patrick-Goudreau
picture from Happy Foody

It is best when served within an hour or two of preparing it, since
it is at its most fresh then, but it holds up just fine in the
fridge.
Preparation Time: 20 minutes
Chilling Time: 1 hour
Servings: 8-12
Crust:
2 cups raw almonds or pecans
3/4 cup pitted dates, preferably Medjool
Filling:
5 cups sliced ripe strawberries
5 pitted dates, soaked 10 minutes in warm water and drained
2 teaspoons fresh lemon juice
Place the nuts in a food processor and grind until they’re a coarse
meal. Add the 3/4 cup of dates (for the crust) and process until
thoroughly combined. Press the mixture into a non-stick or very
lightly oiled pie plate or spring form pan.
Arrange 4 cups of the sliced strawberries on top of the crust and set
aside.
In a food processor or blender, combine the remaining 1 cup of
strawberries with the 5 soaked dates and lemon juice. Puree until
smooth. Pour the sauce mixture over strawberries.
Refrigerate the pie for 1 hour before serving. This will help the pie
set and will be perfect for slicing.

I hope this little look into Bella's party has given you some ideas and inspiration for your next birthday party.

As a thank you for stopping by and in the spirit of giving I want to pass along the cupcake banner. I love it, think it's adorable, hate to see it go but don't want to just store it. So, if you are planning a cupcake party or any little girl party - leave me a comment and let me know. I'll let random.org pick the winner at the end of the week.

Be sure to come back each day this week for more awesome ideas. Tomorrow come back to see how to make THE cutest invitations and cupcake party favors. Once again - not biased=) Seriously, so awesome!

Make your life beautiful,

Sunday, March 28, 2010

Birthday Week is Here!

And we are so excited about the ideas, crafts, and projects that we have to share with you!

Check back bright and early tomorrow for the first of many fun ideas and inspirations.

Here is just a little taste of what is ahead=)

Friday, March 26, 2010

Guest Tutorial From My Repurposed Life

Please welcome Gail from My Repurposed Life who is doing a guest tutorial here today. We are so excited to have her :)

Hi, my name is Gail. I would like to thank Leslie and Melissa for inviting me by to get to know you.  I write a blog called My Repurposed Life. This is what I say in my profile “I am a mom, aunt, sister, cousin and friend to many. I am in the process of repurposing my life, after many life changing incidents. I love to look for trash to turn into treasures! It is what makes me happy, and keeps me busy.”
Coat Rack Memo Board

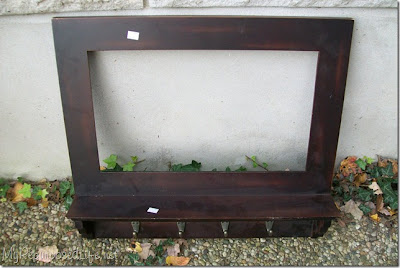
I bought this little beauty at the Peddler’s Mall months ago for less than $5.00. (of course!)

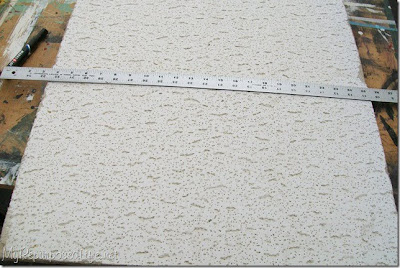
I’ve been debating on what it wanted to be when it grows up. I finally decided that it wanted to be a memo board. Since I didn’t have a bulletin board the right size, I repurposed a ceiling tile that I got at the Habitat for Humanity restore for .10 cents. I measured it and carefully cut it with a utility knife.

I used burlap to cover it. However, if you look closely you will see that I first lined it with paper. I didn’t like how thin the burlap was, allowing the ceiling tile texture to show through.

I taped it all down. I added some webbing for an extra detail and an additional option for holding items. I used hot glue to hold the webbing down. It’s looking a little ugly on the back --

--so I used some white craft paper to cover it all up. I then added some d-rings for hanging.

ta-da! All done! I love the look of the burlap and the webbing together.
I love making pushpins out of unique items. Here you see that I made them out of Scrabble tiles and very old “wooden” checkers.


Pretty cool, huh? I really like the way it turned out!


Gail
My Repurposed Life


Gail- Thank you so much for coming over today and doing one of your amazing tutorials. Go stop by her blog to find all the other treasures she has created!

Leslie & Melissa

Thursday, March 25, 2010

A Bright Spot - Tissue Flower Tutorial

More from my living room update! In the corner of my living room is my favorite piece of furniture of all time - a 1949 cabinet.  I found it at a yard dale for $40!!! I about fainted when she said the price.

Okay anywho, I needed a tall "something" to place on top and was coming up empty.  Then while browsing Martha Stewart's website I saw some wedding flowers made from tissue paper.  Brilliant!

So, I took some bright blue tissue paper and with an Easter bush in mind created this...
Not over the top but just enough "pop" to make it a perfect - and it looks great next to my new thrifted vintage hat box.

I loved the outcome!  It is so cheery and - bonus - I don't have to water them and they will never die=)

To create your own here is what you will need:
- Hot glue gun
- Tissue paper cut into small squares
-Branches

I first crumpled the squares of tissue paper to give it more depth
Then I flattened it out a little and grabbed the middle and "fluffed" out and up.
Add a little dab of hot glue (this is a little blurry because I was rushing to take the picture and get the flower on before it dried!)
And place on the branches...
repeat until your branch is full!

I also did little ones to look like buds=)
It was the perfect touch to my new fabulous living room.  Sigh...love!

Make your life beautiful!

Wednesday, March 24, 2010

A List


I've been doing lots of journaling the last two weeks and it has been very liberating. Even if I write one word that whole day I feel great getting it down on paper. I use to journal as a teenager, I believe I had three journals by the time I left to college. I am on the man hunt to find them and to go back as me during my teens. It would be interesting to see how much I have grown since then plus I want to remember all my adventures :).

Part of my assignments for my Yes! class is to make lists, positive and happy lists. When I read I had to do this I was in heaven. I love lists. I love crossing an item off when I have accomplished it. The other day I was thinking of a list to write and all I could come up with was:

1.Laundry
2. yikes i hate laundry
3. more laundry
4. two more loads of laundry
5. almost there with the laundry
6. last load drying
7. OH NO AUSTIN AND CHLOE MADE A MESS.....another load
8. phew....laundry done for today.


haha! I laughed when I read it the next day but hey it was a realistic list and it told a story of my day. So, grab a pencil and some paper (doesn't have to be a journal) and make a list. A happy list, a positive list, a funny list, a goal list or any ol' list. Write the list in crayons, colored pencils, alphabet stickers, or just make the list pretty. When your done hang it somewhere :) I would love for you to share lists if you guys want or you can email me at mammatortilla@gmail.com.

Happy Writing,


Tuesday, March 23, 2010

Fabric Covered Frames

A few weeks ago I decided that I wanted to do a "little" redecorating before Bella's birthday party this weekend. Well a "little" has turned into a full blown bedroom and living room redo! But in all honesty it was looong overdue.
We moved in 2 years ago and my bedroom only ever received paint and a few badly placed pictures. My living room was, well just plain ugly and the rhyme and reason was nonexistent=)

Well no more my friends=) I love walking in my bedroom it feels so peaceful and complete. My living room is starting to look fabulous, bright, cheery, and I smile each time I enter.

So here is one of the few projects I have done for the living room - Fabric Covered Frames.

*Disclaimer* The pictures you are about to see are in sore need of help. I'm not sure what happened to me and my camera this time around=p Needless to say, they look much better in person!

I got these two frames when I was in High School, but I never knew what to do with them. They stayed in my bedroom when I moved out and every so often my mother reminds me they are there (in an effort to get me to take them) then I remind her that parent's house are free storage for at least 5-10 years after marriage=)

Well, I finally found the perfect spot for them=)


My first idea was to use these frames and little clothes pins to attach pictures. But once I hung them I couldn't bring myself to mess up the "art" with my snapshots. It just looks to clean and with the material I used I think it would have been too busy.

Materials:
Chicken Wire - I technically don't need this now because I'm not going to clip pictures - but I like the look)
staple gun
frame
fabric
wire cutters

1. Lay out and staple chicken wire to the back of the frame.
2. Cut off extra wire around the frame - be careful the wire tends to pop up and cut your fingers=p
3. Lay fabric over wire, staple, cut off extra.

Wha La! Easy, easy, easy=)


Stay tuned for more living room projects!


Make life beautiful,


Related Posts with Thumbnails