Showing posts with label Refashion. Show all posts

Friday, March 26, 2010

Guest Tutorial From My Repurposed Life

Please welcome Gail from My Repurposed Life who is doing a guest tutorial here today. We are so excited to have her :)

Hi, my name is Gail. I would like to thank Leslie and Melissa for inviting me by to get to know you.  I write a blog called My Repurposed Life. This is what I say in my profile “I am a mom, aunt, sister, cousin and friend to many. I am in the process of repurposing my life, after many life changing incidents. I love to look for trash to turn into treasures! It is what makes me happy, and keeps me busy.”
Coat Rack Memo Board

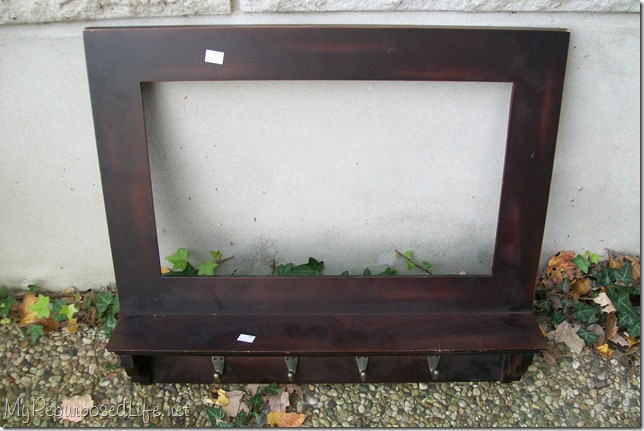
I bought this little beauty at the Peddler’s Mall months ago for less than $5.00. (of course!)

I’ve been debating on what it wanted to be when it grows up. I finally decided that it wanted to be a memo board. Since I didn’t have a bulletin board the right size, I repurposed a ceiling tile that I got at the Habitat for Humanity restore for .10 cents. I measured it and carefully cut it with a utility knife.

I used burlap to cover it. However, if you look closely you will see that I first lined it with paper. I didn’t like how thin the burlap was, allowing the ceiling tile texture to show through.

I taped it all down. I added some webbing for an extra detail and an additional option for holding items. I used hot glue to hold the webbing down. It’s looking a little ugly on the back --

--so I used some white craft paper to cover it all up. I then added some d-rings for hanging.

ta-da! All done! I love the look of the burlap and the webbing together.
I love making pushpins out of unique items. Here you see that I made them out of Scrabble tiles and very old “wooden” checkers.


Pretty cool, huh? I really like the way it turned out!


Gail
My Repurposed Life


Gail- Thank you so much for coming over today and doing one of your amazing tutorials. Go stop by her blog to find all the other treasures she has created!

Leslie & Melissa

Saturday, March 6, 2010

A Home Refashion

I once was just an ordinary wooden box that held tea...........


Now I am a beautiful jewelry box for a special little girl


Supplies you need:
-Acrylic Pain (I used Americana Paint on sale at Michaels. Colors: primary yello, Vivid Violet, Citron Green)
-Paint Brushes
-Krylon Indoor/Outdoor Spray Paint (I used Ivy Leaf color)
-Painter's Tape
-wooden box


1. I put tape on the areas that I did not want the spray paint not to go on. Take your time doing this and make sure you cover the area completely.


2. Go outside and have fun spray painting :) I let the box set out for 24 hours after I was done spray painting and even had to go back for some touch up.


3. I used different sizes brushes when I was doing the flowers. I put flowers on each side of the box. Try out what you want to draw on a blank sheet of paper before starting. I had fun doing this! I felt like a big kid painting and I loved it. What was great about the paint I used was that I was able to take a wet towel and wipe off any mistakes.


I'm giving this box to Chloe for her birthday so she can put her jewelry or any little special item she wants.


Friday, March 5, 2010

Opps! I forgot the "after" picture

Okay, I forgot to post this "after" picture this morning when I posted my refashion=p So, when my husband came home for lunch I had him take a picture. However, I had just given my bathroom and kitchen a deep cleaning so I cut off my head in the picture to spare you the shock=) To see the before click here.


Refashion Friday

Last Saturday, my husband and I were going out on a date and I couldn't find my black cardigan anywhere (I still can't find it)! I mean, my house is pretty small and it was clean (at the time:) so where in the world is that thing?!

Anyway, I didn't want to find a whole new outfit so I did an incredibly quick refashion.

- Cut this shirt down the middle
- ironed on some seam tape
- sewed on a hook & eye
- ironed =)

10 minutes and I love it! I never wore the shirt before because it was too low for me but now it is perfect.

Make your life beautiful!


Thursday, February 11, 2010

Warm & Fuzzy


These fingerless gloves were super easy to make.  I just cut off the sleeves of the sweater and resized them to make them fit my arm. By the way, I threw the sweater in the wash with hot water.  Then I sewed down where I wanted my thumb to be.  Lastly, I added stretchy hem tape.  There you go :) I was going to add buttons to them but I got so excited that they were done and I wanted to wear them, that I said "forget it, they are cute just they way they are."


BYE BYE old wool sweater and HELLO cute fingerless gloves!  Now my hands are all warm & fuzzy.   My husband has been making fun of me because I love them so much I will make any excuse to wear them around the house :) As you see, I wear them inside the house while I drink my tea :)


Hope you have a crafty day,

Friday, January 29, 2010

I'm Thinking....


Warm weather, long afternoon walks, and the farmer's market.  I'm anxiously waiting for spring/summer to get here.  I know its just January and we still have about two more months to go but I am over winter :)  So I decided to start preparing myself for the farmer's market.    Took one of Chloe's old laundry mesh bags that had gotten a hole in it and made it into a cute produce bag :).   I love it!!  It was super easy to make :) It took a total of 15 minutes!!  All you need is a mesh bag of any type, ribbon, stretchy binding, thread, sewing machine and there you go! EASY!

picture taken by Austin (age 2)

Creative Vibes To You,


Thursday, January 14, 2010

Pants to Lacy Scarf

I can't get enough of Ruffles and Stuff - Disney's style is awesome and I love to copy her projects=)  Here is the latest one I have put my spin on.  I took these 60 cent girls super soft pants, cut the legs off, sewed them together and closed the edges.


Then I "borrowed" my mothers basket of lace (as you read this blog you will find that I love to "borrow" from my mom's sewing room!)

Then I just sewed the lace down the length of the scarf.  I would suggest pinning first to make sure you have the strips spaced correctly.  I wear this as scarf by day ...


and when I went out on my anniversary with my husband I wore it as a shawl.


Normally, I'm not a lace kind of girl, but this scarf is to Anthropology too turn away from=)  Okay, no more scarfs...for now=)

Saturday, January 2, 2010

Cute Little Girl Dress


Ooooo pretty little girl dresses!! That's my new thing right now. I  want to be able to open Chloe's closet and see that every dress in there I made. Well, that's the goal anyway. A couple of weeks ago Melissa and I went to the thrift store and found this beautiful old vintage bed sheet. I decided to make a dress for Chloe out of it. Oh my, did it turn out super cute! It is super easy and the design possibilities are endless.

Materials:

1- bed sheet
1- dress for pattern
scissors
pins
sewing machine
matching thread

Step 1-Take the old dress and rip the seams out. Once you have the seams ripped, cut along the shoulder creating two pieces, a front and a back.


Step 2. Lay out the two pieces on top of the sheet. Pin the front and back pieces to the sheet then cut around. The pictures doesn't show it but I made the length longer because Chloe had grown out of the dress I was using for the pattern.


Step 3. I folded the arm sleeves and the bottom of the dress (both pieces) down creating a hem. Iron them down before sewing, its a lot easier that way. Then sew your hem. For the neck line you could do the same thing or add some hem tape or ruffles. The possibilities are endless.


Step 4. Once you have sewn the hems. Place both pieces right sides together. Then pin the dress together.


Step 5. Sew at the shoulders and the sides of the dress. Don't sew the neckline, the opening of the sleeves, and the bottom of the dress :) I've done it before.

Step 6. Turn the dress right side out. VIOLA!! beautiful new dress.


Creative Vibes To You,

Friday, January 1, 2010

My New Red Scarf - read: I'm in love!

I had a red scarf.

It was red.

It was a scarf.

It was okay.

Okay, it was boring.

So...

I added a long straight stitch down the length of my boring red scarf.

Then, I added another long line of long stitches.

I gathered it all up it a simple ruffle.

I added a vintage button from buttons "borrowed" from my mom. ;)

I fudged my way through a button hole (cut a hole and zigzagged the edges)

And now...?


Now I'm in love. Sigh...


Make your life beautiful,

Tuesday, December 29, 2009

Sewing Dork Exchange

  Melissa and I did the gift exchange over at Sewing Dork's blog and I'm just getting around to showing everyone what Rachel sent me.  She saw that we did (and promise we will do) Refashion Fridays so she went ahead and refashioned a basic short-sleeved button down shirt into this fabulous apron.  The pictures don't do it any justice because this quality made!! love it. Thank you Rachel.

Here's what Rachel wrote me:
"When I first signed up for this, I wanted to refashion something, but I wasn't sure how my recipient would feel about that. Then I saw that you were participating in the refashion challenge and knew you wouldn't mind.   I forgot to take a "before" photo, but this just started out as a basic short-sleeved button down shirt.  The only distinctive feature was button tabs at the bottom of each sleeve, which I've incorporated into the final design. Enjoy" -Rachel@titus2homemaker

apron2

apron

apron3


P.S.  I look awful!!!!! sorry i had to write that.  just focus on the apron not my cheesy self!

Leslie

Friday, November 13, 2009

Refashion Friday

We are really excited about today's Refashion Friday. We really did some cute stuff with blah clothes!


Leslie: I took a plain cream scarf and gave it a more modern/textured feel to it. I have seen this type of refashioning in other blogs but wanted to do something different. I was worried how it was going to turn out because of the material the scarf was but I'm thrilled with the results.

plain scarf...booo!!


YEPPIE! final outcome!


Then I got really excited about making another scarf. I got one of my old scarves and .................

Got an amazing green classy scarf!


Melissa:

Okay I started with a large woman's shirt that was quite ugly in my opinion=) I cut the length, shortened the sleeves, took in a lot of material by creating pleated in the front and changed the neckline and added a lovely ruffle. I was thrilled with the results. I wish pictures showed the real results!


WE LOVE REFASHION FRIDAY!!

See you next week!
Les & Melissa
Related Posts with Thumbnails